How to Manage Inventory Cycle Counting
- Alfredo Iorio
- Feb 11, 2023
- 9 min read
Cycle counting is an essential task for companies holding inventory in a warehouse. This method allows users to count inventory regularly to find and correct discrepancies. Cycle counting also allows companies to check inventory before the year-end, so they don't have to stop operating for a few days when it's time for a complete stock check.
Business Central allows the setup of specific cycle counting codes to schedule cycle counting activities automatically. In this post, I will describe the setup and the complete process to manage cycle counting Busines Central, including the differences between basic and advanced warehousing.

Decide cycle counting frequency.
The first step to managing cycle counting in Business Central is to create physical inventory counting period codes. These codes define the frequency we want to use to count our items. I always try to link a physical inventory counting period to an inventory classification, the most used being the ABC classification.
ABC Inventory Analysis
In inventory management, ABC analysis is a categorisation technique. This tool divides an inventory into three or more categories: A products are costly and fast-moving items, maybe with fast obsolescence that require strict inventory control and accurate stock records. B products require less strict control and good records. Lastly, C products with the simplest control possible and minimal records.
The ABC analysis provides a mechanism for identifying items that will significantly impact overall inventory cost while also providing a tool for identifying different categories of stock that require dedicated controls. The physical inventory counting periods should mirror the company's ABC categorisation. The goal of setting up these codes should be to assign a higher frequency to the items that require accurate records and a lower frequency to items that require minimal control.
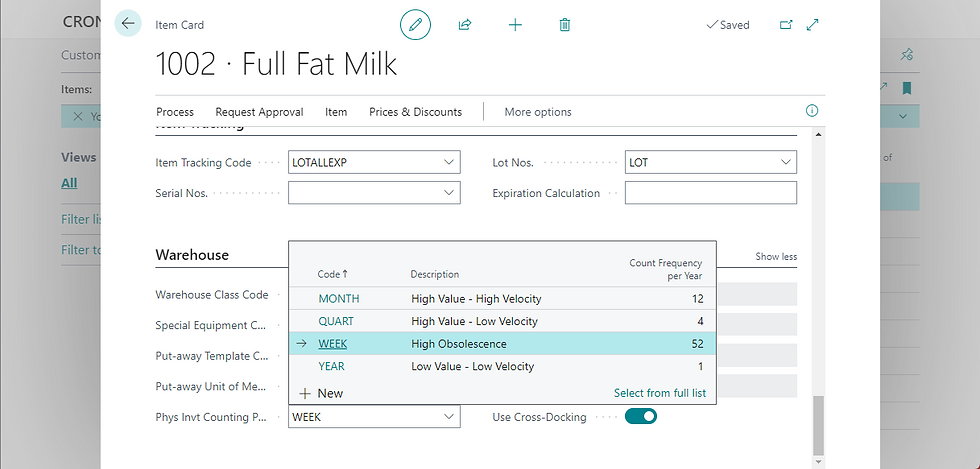
In the picture above, you can see an example of a basic setup that I use to demo the functionality in my sandbox. I have a "Month" physical inventory counting period code with a frequency per year of 12. I also have a quarterly and a yearly code for my B and C items.
Find the page Physical Inventory Counting Periods (or click here to open the page in Business Central) and create the codes you want to use.
Assign frequency codes to items.
After creating four codes, we can assign them to items. To do this, we use the field Physical inventory counting period in the warehouse tab of the item card. For this example, I will use my item 1002, which also has lot tracking with expiration dates, so we can see how to perform stock counts for lot-tracked items.
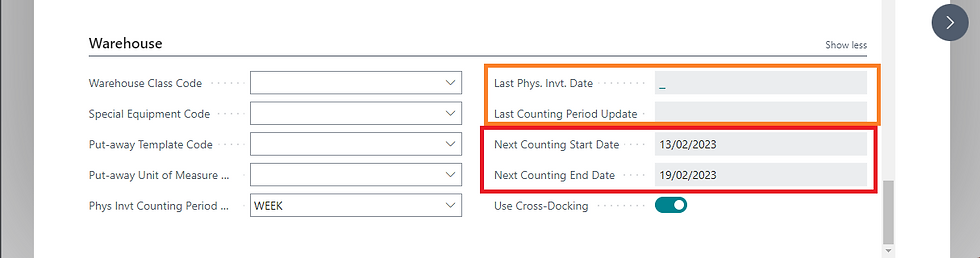
Two fields will automatically update after we put a value in the physical inventory counting period: the Next Counting Start Date and the Next Counting End Date. Business Central will use these two fields to suggest what we need to count and by when. If you get strange dates in these fields, check the working date in user settings. The working date will also drive additional logic when we run the functionality to count our stock.
The picture below shows the two fields' values after I entered the code Week on the item card. The Last Physical Inventory Date and the Period Update are empty because I never performed a physical count for this item.
I can run a cycle count now that the setup is complete. The process is different depending on the location setup.
Simple Warehousing: Use Physical Inventory Orders
We manage cycle counting through physical inventory orders in Business Central in a location with simple warehousing, which means Directed put-away and pick are not enabled.
First, find the page physical inventory orders (or click here to open the page in Business Central. Then click New to create a new document. The physical inventory order is arranged in two parts, like most orders in Business Central: the header and the line section.
We choose the location in the document header; this code will not default to a specific value; users must select a location code and use only a location with basic warehouse management features; if not, we will get this error:

The Person Responsible field in the document header is useful for companies with simple warehouse processes because it uses the employee table, not the users'. By using employees instead of users, Business Central allows companies to link a physical inventory order to a warehouse user without a licence.
The order date is optional, while the posting date is mandatory and will default to the working date. The posting date on the document header will be copied to the lines and stamped on the inventory transactions - stock write-on or off - generated by the order.
The next step is to run the function Calculate Counting Period. This function calculates and shows all the items that require counting.
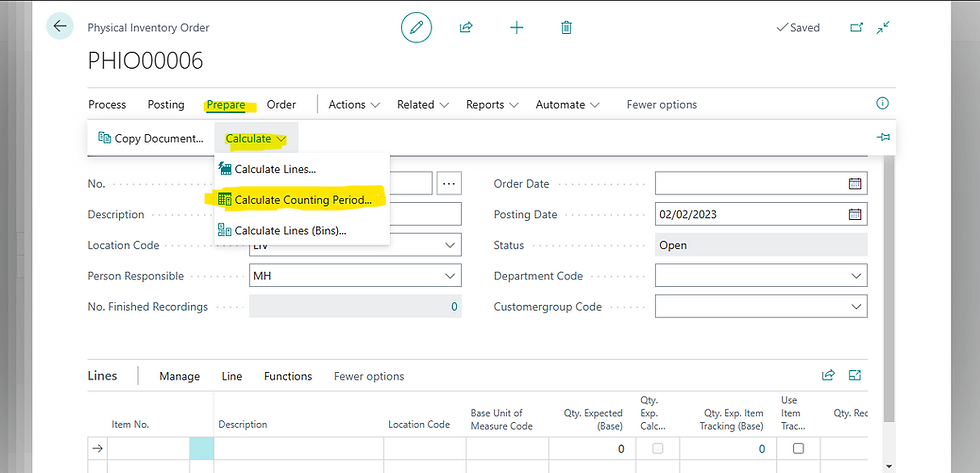
Business Central will show items if your working date falls within the counting dates range.
The picture below shows the results page Physical Inventory Item Selection after I run the calculation in my sandbox. You can see that my item 1002 is not included.

I got only two items on my list because my working date is outside item 1002 counting date range. You can see in the previous paragraph that item 1002 counting date range starts from 13/02 to 19/02. My work date is 02/02. Therefore, it is too early to count that item.
I can change my working date on the My Settings page and set it to 14/02. Then I recalculate the counting period. The picture below shows the result.

I can select all or just some items in this list using the selection option in the page lines. This allows a warehouse manager to create multiple physical inventory orders for the same counting period. For example, one order for each item category.

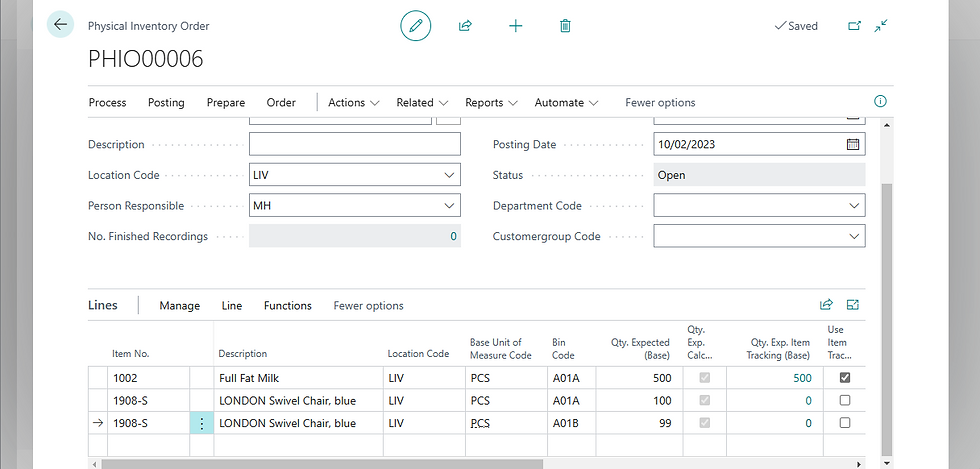
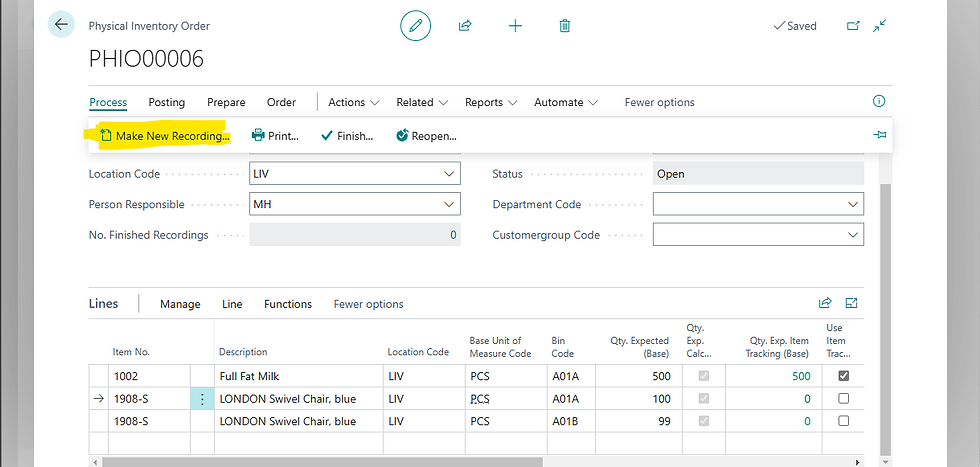
After clicking OK, the lines selected will appear on the physical inventory order lines. Note that lines can be split if the content on one item is found in different bins, like for my item 1908-S
The physical inventory order is complete, and we can proceed to the next step, the physical inventory recording. It might be counterintuitive, but we cannot enter quantities on the physical inventory order. This document's purpose is to plan the stock count, and we record the actual quantities in the following step. The Physical Inventory Recordings.
We create one or more recordings using the action Make New Recording under the Process menu.
After clicking on the Make New Recording action, we are prompted with a confirmation page. We can add filters on this page to get only certain lines from the order to the recording. This filter is useful if the physical inventory order contains multiple lines and we want to divide the counting tasks. For example, we can create one recording for a specific bin or item. More recordings can be registered for the same item.

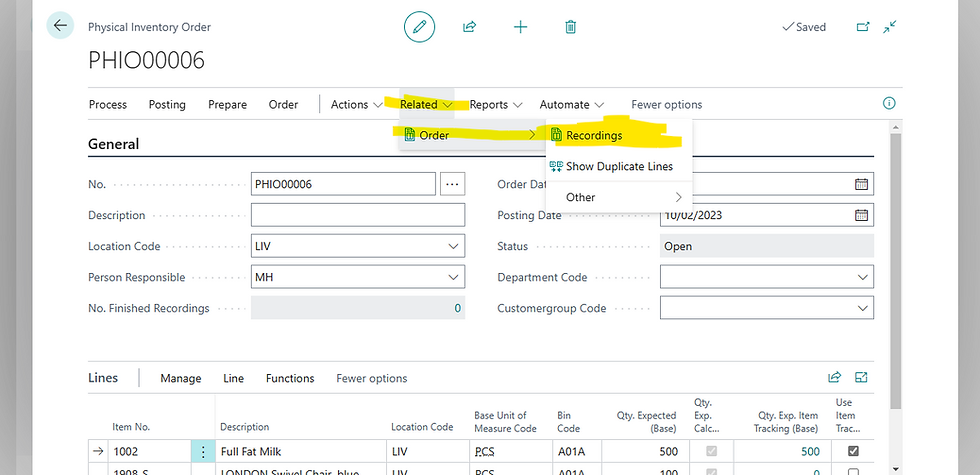
In this example, I create one recording for my item 1908-S only because my other item is Lot tracked and requires a different process. The new recording can be found under the Related menu in the Order section, as shown in the picture below.
The recording is a subset of the physical inventory order and stores the order details and the recording number. We can also assign the recording to specific employees and input the date and time of the recording. Another feature of the recording is that we can print the document in a user-friendly format and hand it to a user.
We can enter the quantity on the recording lines and click finish when done.
The field Recorded gets updated as we enter the quantities on the recording lines.
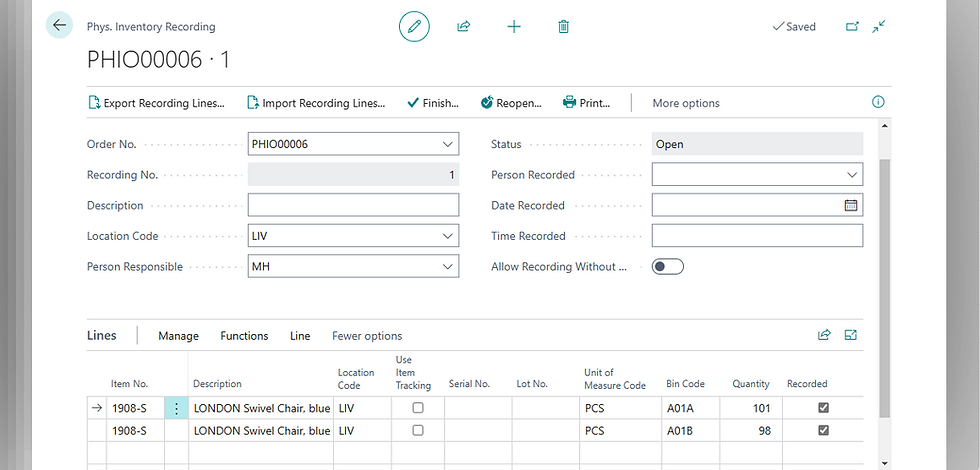
Another useful feature of the physical inventory recording is adding lines to the document. This might be needed if we found items in a bin that was not included on the order lines. For example, my order showed item 1908-S in bins A01A and A01B, but the user found two pieces in bin B01A, so I added a line. I also toggled the field Allow Recording Without Order in the document header before I finished the recording with the added line. This field controls where we can or cannot add lines to a recording that were not included in the physical inventory order.

The recording is completed when I click on the Finish action. Note the document status shows Finished. I can close the document and return to my physical inventory order.

The physical inventory order lines get updated after we finish the physical inventory recording. We can see that the quantity recorded shows on the order lines, and the field Recorded is ticked.
The last step is to post the order. This action will post physical inventory entries and inventory transactions if the total quantity of an item is less or more than expected. We must also change the order status to Finished before posting the order, but I will not do it just yet, because there is one more item on my order, and this is a lot-tracked item that I want to count using a separate recording.
Cycle count items with expiration dates
As I mentioned above, we can make many recordings for a physical inventory order. In this example, I want to use a separate recording for item 1002 because it has lot-tracking enabled with expiration dates.
Additional fields and functionalities exist for items tracked with Lot or serial numbers. The first field shows on the order line page: Quantity Expected Item Tracking (Base). The other is the Use Item Tracking field, which is a tickbox. If we untick this field, the inventory recording can be registered without entering the lot number and expiration date.
Though this functionality might help complete a stock count faster, I don't typically recommend disabling this field unless the tracking is for the serial numbers, which I will cover in another post.
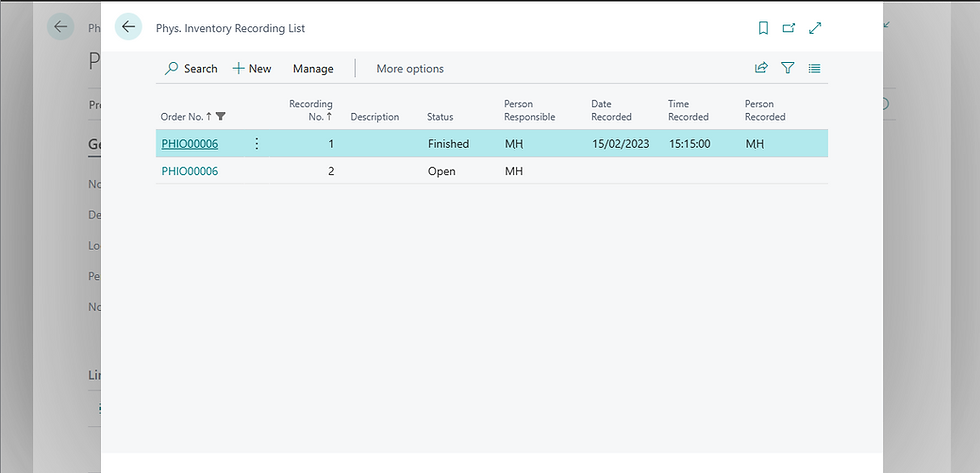
As mentioned, we can create many recordings for a physical inventory order. I again used the Make New Recording functionality for my order PHIO00006, and I got a separate recording for item 1002, which is tracked with lot numbers and expiration dates. I describe the tracking functionality in another post you can read here: The Complete Guide to Lot Numbers.
I can see the list of recordings and their status by clicking on Recordings. My first recording shows as finished, and the new one is open.
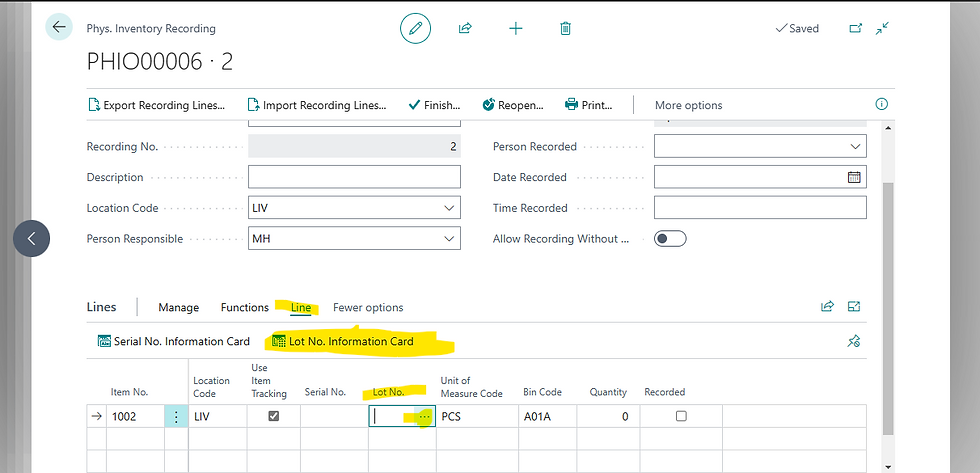
The recording line for my item with lot tracking will show the field Use Item Tracking, although the field Lot No. is empty, like the quantity field.

A user counting this item must record the quantity and the lot number before finishing the recording. Users can also see the expected quantity by lot number if they click on the three dots in Lot No. field. Alternatively, we can use the action Lot No. Information card in the line menu to see the available lots.
Even in this case, I can add more lines if the item is found in a bin for which there is no expected quantity. I added an additional line in this example and updated the lot number information with a new lot.

I completed my recording and can update the document status and return to the physical inventory order. The order contains the new lines added during the recording. The document shows the number of recordings, and the lines show the quantity expected and recorded.

Lastly, we can post the order to update our inventory. First, we change the order status using the Finish action under process. Then, we click Post under Posting.
If the setup is correct, the order will be posted and deleted. We can always access the posted order and recording in the archive.

Advanced Warehousing: Use Warehouse Physical
Inventory Journals
Running a cycle count in a location with directed put-away and pick is different and more straightforward.
First, we cannot use physical inventory orders and recordings; we use a Warehouse Physical Inventory Journal. Second, we cannot assign counting tasks to warehouse personnel in the document. Instead, we use journal batches.
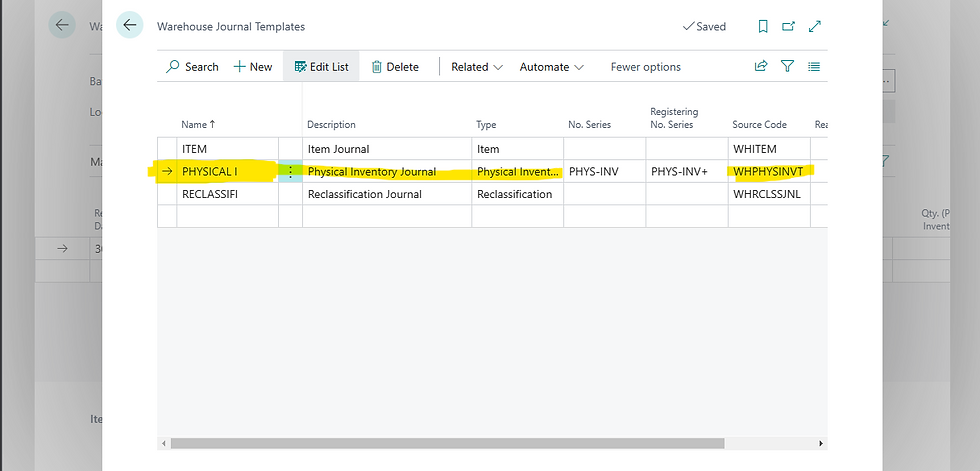
Warehouse physical inventory journals require location-specific journal batches for the correct template. Below is an example of a standard configuration. You can see my template for the physical inventory journals.
I also have user-specific batches by location.

From here, the process of calculating counting periods is the same. We run the action Calculate Counting Period to populate the journal lines.

This document is simpler to use because it does not require recordings and shows tracking information on the document lines.

There is no option to post a warehouse physical inventory journal because this document does not post inventory transactions. We must register the document lines first.

The last step of the process is to post an item journal. This step will reconcile the physical inventory entries and the bin content with the inventory sub ledger (Item Ledger Entries in Business Central). There is no need for manual data entry in this journal because Business Central will not allow an item journal in a location set up with directed put-away and pick.
We need to run a specific action to populate our item journal lines with all the warehouse adjustments resulting from the physical inventory count. This action is called Calculate Warehouse Adjustments.

The journal will show the lines to adjust as calculated when we registered the warehouse physical inventory journal.

Closing thoughts
Cycle counting can help improve inventory accuracy. However, counting inventory is a time-consuming task that should be balanced with the rest of a busy warehouse's activities. Using physical inventory counting codes in Business Central allows companies to plan cycle counting by item type and count fast-moving items more often than others.
Regards
Alfredo Iorio
Comments